 |
OpenMS
|
This document addresses OpenMS users and explains the installation procedure for building OpenMS from its sources. If you only want to use the OpenMS PiPeline (TOPP), you are strongly encouraged to download the windows binary installer (see here), instead of building OpenMS from sources. For more information read the install instructions for the TOPP binaries.
Most third-party libraries required by OpenMS (Boost, Eigen, Xerces-C, Apache Arrow, ...) are obtained automatically through vcpkg when you configure OpenMS with one of its CMake presets; see Building OpenMS Using vcpkg for the general guide. This page covers the Windows-specific parts: the compiler, Qt (which you install yourself) and building in Visual Studio.
If you encounter errors during configuring/compiling our software, search in our issue tracker, already known. If not, please write to the mailing list (open-ms-general AT lists.sourceforge.net) or report the error on our issue tracker.
Notation of this tutorial
Pre-Requisites (Software)
Qt comes in two flavors: commercial or non-commercial - choose whatever is applicable to you: read more on the Qt website. For several recent Qt6 versions, there are binary development versions available for the most recent compilers.
Installation of Qt6 via the Qt6 installer (requires an admin account):
Go to https://www.qt.io/download and find the download for the Qt binaries installer, download it and run the Qt binary installer. You will need to create a free user account with Qt, and log into that account during installation. The installer will ask for an installation directory, choose, e.g. c:\dev\qt6. From the components choose a matching version, e.g. Qt 6.7.1 and pick the MSVC binaries (e.g. MSVC 2019 64-bit), the Sources (for Qt headers) and Qt Debug Information files (optional).
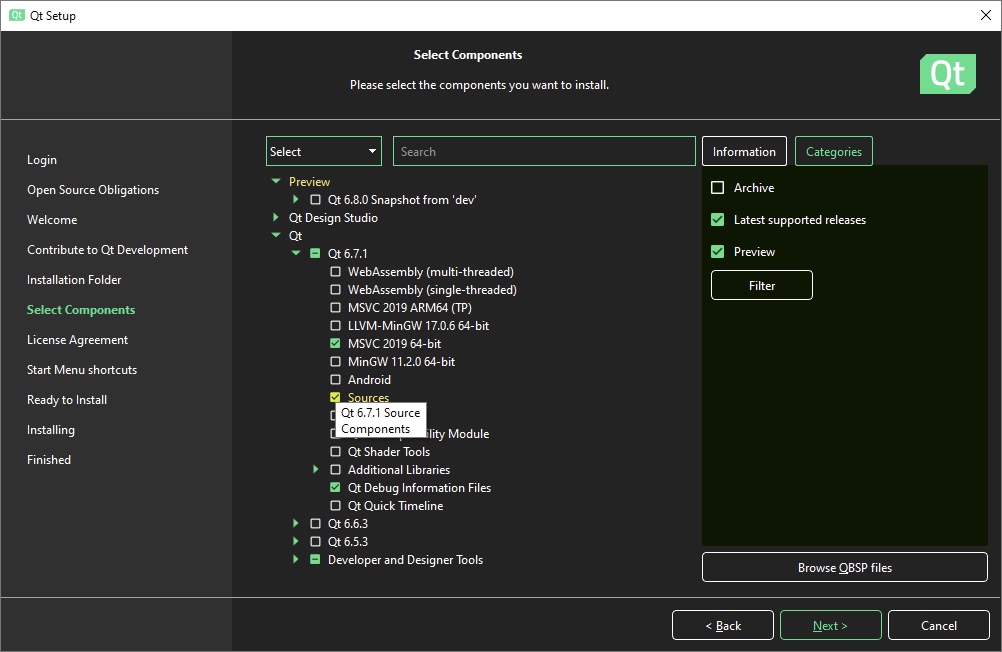
If your Visual Studio version is more recent than the VS offered by the Qt installer, choose the closest available – they should be compatible. Resulting files appear under c:\dev\qt6\$VERSION (if you chose c:\dev\qt6 as installation directory).
Alternatively (no admin account required), compile Qt from sources. We cannot cover all the details here. See https://wiki.qt.io/Building_Qt_6_from_Git for details.
Finally, add the Qt bin directory (i.e the location of Qt6Core.dll, e.g. C:\dev\qt6\6.7.1\msvc2022_64\bin)to your Windows PATH Environment variable. If you forget this, starting any OpenMS executable will result in an error such as The program can't start because Qt6Cored.dll is missing from your computer.
In addition, to run any of OpenMS' GUI apps (such as TOPPView), you need set the QT_PLUGIN_PATH environment variable to the plugins subdir of your Qt installation. E.g. set QT_PLUGIN_PATH to c:\dev\qt6_2\6.7.3\msvc2022_64\plugins.
For most of the steps below you need a command prompt which is aware of where components of Visual Studio (compiler, linker etc) are installed. Do not use a plain 'cmd' Command prompt. Certain steps will fail or find the wrong components (mostly when running CMake).
Open a VisualStudio Developer Command prompt for x64 (64-bit) since OpenMS only builds as 64-bit! (by default you may get a 32-bit environment)
"C:\\Program Files\\Microsoft Visual Studio\\@minMSVCYear\\Community\\VC\\Auxiliary\\Build\\vcvars64.bat" tools/load_vcvarsall.sh if you are building in bash on Windows.For development and cutting edge functionalities we recommend using the Git version of OpenMS from GitHub.
Clone OpenMS together with its submodules. This also checks out the vcpkg submodule, which OpenMS uses to obtain its third-party libraries (see Building OpenMS Using vcpkg):
If you already have a clone without submodules, fetch the vcpkg submodule with git submodule update --init vcpkg.
If you want to use a release version of OpenMS, use the corresponding Release-tagged version on GitHub (https://github.com/OpenMS/OpenMS/tags), e.g.
Releases before OpenMS 3.6.0 do not use vcpkg; follow the build instructions in the documentation of that release instead.
You do not need to build the third-party libraries (except Qt, see above) yourself: vcpkg builds them the first time you configure OpenMS (see below).
This section is optional. If you can live with the online documentation, you do not need to build your own.
In order to build the class documentation (doc target), TOPP tutorials (doc_tutorials target) and more, you will need to install two programs:
dot tool) is only needed for the optional doc_dot target, which builds the documentation with all dependency graphs (include, collaboration and directory graphs). The regular documentation targets do not need it. choco install graphviz) dot.exe is on the Windows PATH Environment (please recheck) You should install the above apps prior to installing OpenMS (see below), because otherwise during the configuration step the documentation targets will be disabled. If you already have a working installation of OpenMS (without documentation), you can simply install the above programs and reconfigure OpenMS by calling cmake . in your build tree. No need to recompile the library!
This part assumes sections Obtaining the source code and QT installation have been completed! I.e. we assume you have the OpenMS source code and will now build the OpenMS library, TOPP tools, class tests etc.
OpenMS is configured with one of the windows-x64-* CMake presets, as described in Building OpenMS. The presets set OPENMS_USE_VCPKG=ON and point CMake to the vcpkg toolchain, so all third-party libraries except Qt are built by vcpkg.
To create the build system:
C:\dev\OpenMS): each preset builds into build/<preset> inside it. We suggest less than 40 characters if possible. Call CMake with a preset to create the build system. For a Visual Studio solution that can build both Debug and Release, use the debug preset together with a Visual Studio generator:
The CMAKE_PREFIX_PATH should hold the path to your Qt6 build/binary directory where Qt6Config.cmake resides (see example below). Note that it is NOT the main Qt6 directory, but the subfolder which is named after the toolchain it was build with (e.g. CMAKE_PREFIX_PATH=C:\dev\qt6_2\6.7.3\msvc2022_64\lib\cmake\Qt6).
The <generator> must be a Visual Studio generator if you want a solution file. Type cmake --help to see a list of available generators. Without -G, the presets use Ninja and you build from the command line with cmake --build --preset <preset> instead (see Choosing a CMake generator). With a Visual Studio generator, use the -A x64 flag to build a 64-bit OpenMS library and TOPP executables (32-bit does not really make any sense for LC-MS data processing)! The windows-x64-release and windows-x64-relwithdebinfo presets only provide release versions of the third-party libraries, so a Visual Studio solution configured with them cannot build the Debug configuration.
The first configure takes a while, since vcpkg builds all third-party libraries from source; later configures reuse them from build/<preset>/vcpkg_installed. vcpkg builds them as static libraries with the matching (debug or release) runtime, so no third-party DLLs need to be added to your PATH.
Example:
You can set more CMake variables adding -DVARIABLE=VALUE options when calling CMake.
The most important CMake variables are:
| OPENMS_USE_VCPKG=On/Off | Take the third-party libraries from vcpkg (On) or from system packages and CMAKE_PREFIX_PATH (Off). With On, CMake needs the vcpkg toolchain: the presets and the initialized vcpkg submodule provide it, or pass -DCMAKE_TOOLCHAIN_FILE=<vcpkg root>/scripts/buildsystems/vcpkg.cmake. See Building without vcpkg (system packages). (Default: Off; the presets set On) |
|---|---|
| CMAKE_PREFIX_PATH | Additional search path for libraries. [MacOSX only] If you want to use libraries installed via Homebrew or MacPorts you might need to provide the corresponding paths
|
| Qt6_DIR | Additional search path for the Qt6 CMake files. Use /PATH/TO/QT_INSTALLATION/lib/cmake/Qt6 as value, e.g. C:\dev\qt6\6.7.1\msvc2019_64\lib\cmake\Qt6 |
| HAS_XSERVER=On/Off | [Linux/MacOS only] Defines if a running X Server is available when building OpenMS. As building parts of the documentation and running certain tests requires a running X Server, this flag can be used to disable those parts of the documentation and the tests that need an X Server. (Default: On) |
| ADDRESS_SANITIZER=On/Off | [g++/clang only] Enables/Disables Address Sanitizer (ASAN) to find access violations and other bugs. |
| OPENMS_VERIFY_INTERFACE_HEADER_SETS=On/Off | Enable public-header compile checks. Build all_verify_interface_header_sets explicitly; see Verifying public headers. (Default: Off) |
| WITH_GUI=On/Off | Defines if the OpenMS GUI tools (TOPPView, TOPPAS) should be built or not. If you plan to use OpenMS without a GUI, set this flag to "Off" (Default: On) |
| BUILD_TOPP_TOOLS=On/Off | Build the TOPP command-line applications (src/topp). Set to "Off" to build only the core OpenMS library, e.g. for a standalone SDK consumed by an external application. ENABLE_TOPP_TESTING and ENABLE_PIPELINE_TESTING default to following this flag, and ENABLE_CWL_GENERATION requires it to be "On". (Default: On) |
| INSTALL_OPENMS_EXAMPLES=On/Off | Install the OpenMS example data alongside the library/tools. Set to "Off" to skip installing example data, e.g. for a minimal standalone SDK install. (Default: On) |
| WITH_OPENTIMS=On/Off | Enables support for reading Bruker TimsTOF .d directories directly (without prior conversion to mzML) via the opentims library. When enabled, OpenMS will attempt to locate a system installation of opentims; if none is found, it is fetched and built automatically from source via CMake FetchContent. Adds .d (and .d.zip) input to CometAdapter, FeatureFinderIdentification, FeatureFinderLFQ, FeatureFinderMetaboIdent, FileConverter, IonMobilityBinning, MetaboliteSpectralMatcher, NucleicAcidSearchEngine, OpenSwathPeakMapExtractor, OpenSwathWorkflow, PeakPickerIM, ProSE, ProteomicsLFQ, SageAdapter, SimpleSearchEngine and TransitionListEvidenceFilter. (Default: On) |
| ENABLE_OPENTIMS_TESTS=On/Off | Download Bruker TimsTOF test data sets (DDA and DIA) and enable the corresponding integration tests. Requires WITH_OPENTIMS=On. The test data are fetched automatically via CMake FetchContent when this option is turned on. (Default: Off) |
| ENABLE_DOCS=On/Off | Enables documentation targets, allowing to build the OpenMS documentation. (Default: On) |
| GIT_TRACKING=On/Off | Embed Git checksum into the library. (Default: On) |
| ENABLE_UPDATE_CHECK=On/Off | Check online for OpenMS Updates upon invocation of any TOPP tool. (Default: On) |
| CMAKE_BUILD_TYPE | [makefiles only; does not apply for XCode or VS] Should be either 'Release' (optimization enabled) or 'Debug' (debug info and precondition/postcondition checks enabled). The default is Release. |
| CMAKE_CXX_COMPILER | Defines the C++ compiler to use. |
| MY_CXX_FLAGS | Additional custom C++ compile options you would like to add (must fit your chosen compiler). This might be useful, for example, for adding debug symbols to a Release build, or for performance analysis (e.g. for ... -DMY_CXX_FLAGS="-Og;-ggdb;-g3;-fno-omit-frame-pointer" ...) |
| CMAKE_C_COMPILER | Defines the C compiler to use. This should match the C++ compiler. Mixing compilers (e.g., clang++ for C++ and gcc for C) can lead to undefined behaviour as some internal settings (e.g., OpenMP support) are determined using the C compiler and are assumed to be the same for the C++ compiler. |
| SEARCH_ENGINES_DIRECTORY (optional) | The location where thirdparty search engines (such as Comet and MSGF+) are located. This directory should have the same structure as the example in the search engine repository at https://github.com/OpenMS/THIRDPARTY after flattening for your platform. /. This directory is only needed to include thirdparty tools in the installer for OpenMS. |
| PYOPENMS=Off/On | Create Python bindings, see also pyOpenMS (Default: Off) |
| USE_EXTERNAL_SQLITECPP=Off/On | Use external SQLiteCpp library from system instead of vendored version. Recommended for Linux distributions to avoid file conflicts. (Default: Off, On for Ubuntu in CI) |
| USE_EXTERNAL_JSON=Off/On | Use external nlohmann-json library from system instead of vendored version. Required on Ubuntu due to Apache Arrow bundling. (Default: Off, On for Ubuntu in CI) |
| USE_EXTERNAL_SIMDE=Off/On | Use external SIMDe library from system instead of vendored version. Recommended for Linux distributions. (Default: Off, On for Ubuntu in CI) |
| LP_SOLVER=AUTO/COIN/GLPK/HIGHS | Select the linear programming solver backend. AUTO (default) tries COIN-OR first, then GLPK, then fetches HiGHS automatically via FetchContent if neither is installed. Set to COIN, GLPK, or HIGHS to require a specific solver. |
| WITH_THERMO_RAW=On/Off | Enable native reading of Thermo Fisher RAW files via the openms-thermo-bridge C++/.NET library (fetched automatically via CMake FetchContent from GitHub). Requires a .NET runtime to be present at run time so that the managed bridge DLLs can be loaded. Install the .NET 8 runtime from https://dotnet.microsoft.com/download, or install the dotnet-runtime-8.0 package from your distribution's package manager. On Windows and macOS the required nethost library is bundled with the .NET SDK/runtime installer. On Linux you may need to install the additional libnethost-dev (Debian/Ubuntu) or dotnet-runtime-8.0 package explicitly. At run time the bridge's nethost/hostfxr locates the installed runtime automatically when .NET sits in a standard location. If you installed .NET to a non-default directory (for example via the dotnet-install.sh script or an xcopy install of the runtime), set the DOTNET_ROOT environment variable to that directory — the folder that contains the dotnet host and the shared/ sub-directory (e.g. export DOTNET_ROOT=/usr/share/dotnet) — so the runtime can be found. The managed half of the bridge (ThermoWrapperManaged.dll, its runtimeconfig.json and the Thermo CommonCore assemblies) is installed both next to the bridge library and into share/OpenMS/openms_thermo_bridge/managed; OpenMS looks in the OPENMS_THERMO_MANAGED_DIR environment variable first, then in the share directory, then next to the bridge library. To build without a NuGet/GitHub round trip for those assemblies, pass the bridge's own -DOPENMS_THERMO_BRIDGE_PREBUILT_MANAGED_DIR=/path/to/extracted-zip (the zip is published with every openms-thermo-bridge release) or -DOPENMS_THERMO_BRIDGE_DOWNLOAD_PREBUILT_MANAGED=ON; the native bridge then only needs the nethost headers from a .NET SDK / host pack. (Default: On) |
| ENABLE_THERMO_RAW_TESTS=On/Off | Download a small Thermo RAW test file and enable integration tests for the Thermo RAW reader. Requires WITH_THERMO_RAW=On and a working internet connection during CMake configuration. (Default: Off) |
| WITH_WNETALIGN=On/Off | Enable the Wasserstein network alignment feature (FeatureLinkerWNet TOPP tool). When enabled, the three header-only libraries pylmcf, wnet, and wnetalign are fetched automatically via FetchContent. (Default: Off) |
| WITH_ONNX=On/Off | Enables ONNX Runtime support for machine-learning based inference modules, currently used by the PeptDeep predictors. This option requires an external ONNX Runtime C/C++ installation that can be found by CMake. Usually this can be done by adding the root directory of an ONNX Runtime release package to
Alternatively, set |
| OPENMS_PEPTDEEP_MODEL_URL | [with WITH_ONNX] Base URL from which the PeptDeep ONNX model files are downloaded during configuration, e.g. a mirror for a build without access to archive.openms.de. (Default: http://archive.openms.de/openms/models) |
| CMAKE_INSTALL_PREFIX | the path where the bin/ and lib/ directories should be installed to (when sudo make install is wished for a system-wide install: e.g. For development, install prefixes are not supported. In this case OpenMS must be built in place! |
cmake at least once.
With a Visual Studio generator, there should now be a OpenMS_host.sln file in your build directory (build/windows-x64-debug in the example above), which you can open using Visual Studio. If you want to work on only a subset of OpenMS (e.g., OpenMS_GUI) you can open the specific solution that you will find in the src/ folder of your build folder and below (e.g. src/openms_gui/OpenMS_GUI.sln).
Try to build the OpenMS library - the target is called 'OpenMS'. This will create the OpenMS Dll library. If you used the debug configuration it will be called OpenMSd.dll, in release mode its called OpenMS.dll.
As a last step you should add the location of the binaries (dll's and executables) to your PATH environment. This makes calling TOPPView and TOPP tools more convenient if you are working the command line. Also, external projects (see External Code using OpenMS) require the OpenMS dll (OpenMS.dll or OpenMSd.dll) to be in the PATH. Depending on the generator and configuration used you will find the dll in [OpenMS_build]/bin/Release or [OpenMS_build]/bin/Debug (for VS) or just [OpenMS_build]/bin (Ninja). In the same folder the TOPP tools will reside once build (see next section). Be aware that the order of directories in the PATH variable determines which dll or executable is used, if no absolute path was given when the executable was called. So the PATH might need to be updated (add/delete/reorder entries) if you are working with multiple installations or configurations of OpenMS.
TOPP is a toolset for the analysis of HPLC-MS data. It consists of several small applications that can be chained to create analysis pipelines tailored for a specific problem.
After you have built OpenMS, you can build the TOPP tools by building the "TOPP" project in the IDE.
Each class in OpenMS and each TOPP tool has a unit test. The tests will be build with the complete solution. To specifically build and execute the tests, go to your OpenMS build_tree and further into ./src/tests/class_tests. There you'll find an OpenMS_class_tests.sln file, which you can open. For other generators an equivalent file with another suffix will be present. Now, build the 'ALL_BUILD' target and the 'RUN_TESTS' target. You can also run the tests in a command prompt in <OpenMS_build_tree> using ctest. Single tests can be run with ctest -R <testnameregex>, e.g. ctest -R Base64_test. For more syntax on CTest look at the online documentation at http://cmake.org/.
The Visual Studio solution files can contain many targets, which makes the IDE a bit sluggish especially when starting up the first time. The OpenMS class tests are by far the largest.
If you just want to compile the library or executables, it's usually faster to use the commandline. Visual Studio solution files can be used here as well, as arguments to MSBuild.exe, e.g.
Example:
OpenMS/tools/build.bat and in the root of your build tree (copied there by cmake for convenience), which allows to build the most important targets (TOPP, Gui, Tests, Doc) in Release or Debug using very short notation. Call it without arguments to see its usage help text. For example to build only the OpenMS library in release mode, callThis section is for users that already have a little experience with IDEs like VS Code or JetBrains CLion. Especially the first step requires to read through the beginning of this documentation.
Git: clone, then type and search for OpenMS/OpenMS. Select a folder. Wait for clone to finish. Open clone. Trust authors. git submodule update --init vcpkg > CMake: Select Configure Preset, select a windows-x64-* preset (e.g. "Windows x64 Debug"). Start VS Code from a Developer Command Prompt for x64 (see Using the correct command line), so that the compiler and Ninja are found. > CMake: Configure. The first configure builds the third-party libraries through vcpkg and takes a while. Add the NSIS folder (which contains 'makensis.exe') to your PATH, so CMake can find it.
Checkout the THIRDPARTY GitHub Repository and flatten the structure for the target platform, e.g. copy all subdirectories in ./all/ to ./Windows/64bit/.
Configure OpenMS as usual with additional flags SEARCH_ENGINES_DIRECTORY (for the flattened THIRDPARTY directory) and PACKAGE_TYPE="nsis", e.g.
Build all targets (incl. 'doc' and 'doc_tutorials') in Release mode (copy the Qt6 plugin to the [OpenMS_build]/bin/Release and [OpenMS_build]/doc/doxygen/parameters/Release/ directories first)
 1.9.8
1.9.8 